| Assignment Day | Wednesday, June 01, 2016 |
| Due Date | Friday, June 10, 2016 5:00 PM |
[H2] Blending : Multiplicity
Overview:
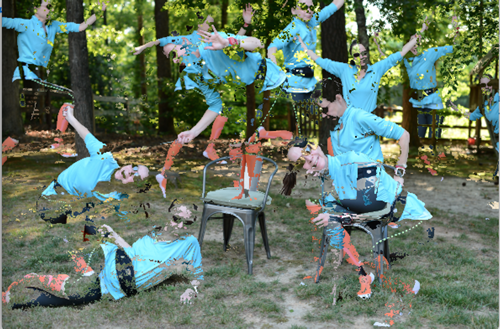
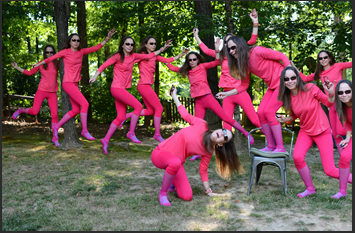
The goal for this project is for you to learn how to compose multiple images together, one on top of another to provide a final “multiplicity” image. In multiplicity photography you take several photos of a subject: animal, or object in different areas of the frame, and then combine them into one image. Overall, the the idea is that you start with a background image, then layer on top, one by one, new images. The intent is that as you add new images, the pixels that are significantly different are selected in favor of the background image. I provide some example images for you to work with (see here zip file with all images available), but for your final submission you need to use your own photographs. The subject for these photos should be either yourself or a classmate. You are in charge of the setup, and designing the image, even if you take pictures of another person.
Example(s):
The images above were composed by hand in photoshop, so they represent a benchmark that we can strive towards. The image below was created algorithmically in python. It uses computation purely in openCV using simple arithmetic. Note it is less ‘precise’ than the photoshop results, but this image illustrates an acceptable level of result for this homework.
You can do better by tweaking parameters, such as threshold values of pixel values that needs to be ignored or not or use more more complex algorithms.

Task: What you should do:
Write code that accomplishes the following:
1. Read in all images you need into an array [].
1a.
Use the 0 index as the 'background image'.
1b.
Consider scaling (the provided) images by cv2.resize() by a factor of 0.12 of their height and width so they fit on the screen when displayed.
2. Iterate over the array of images. For each image:
2a. Create two 'masks' fgmask, and bgmask (bgmask is the inverse of fgmask).
2b. fgmask masks out the 'difference' of the fgmask (hopefully the subject).
2c. fgmask: highlights subject in foreground image. (normal mask)
2d. bgmask: black out area in background image to excludes the subject. (inverse mask).
3. Add in pixels (of foreground) into a 'composite image' (consider blacking out pixels first using the inv mask)
Primary Hint and Reference:
http://docs.opencv.org/master/d0/d86/tutorial_py_image_arithmetics.html#gsc.tab=0
Creating the mask can be done in a variety of ways, one approach is to use standar techniques from the above tutorial that first greys both the foreground, and background images, subtracts the background from the foreground, and then refines the mask by using cv2.treshold(). [note here we added cv2.subtract() to the linked tutorial above and got better result].
Play around with threshold parameters, and subtraction to refine the mask.
Another method is to use techniques used in video, and use cv2.BackgroundSubtractorMOG().
Potentially Useful Code Snippet(s) and References:
Possibly useful command performing mathematical operations on images.
## grey, subtract, threshold to create mask

      # scale using a factor of 0.12


cv2img_sz = cv2.resize(cv2img,( int(factor*width), int(factor*height)), interpolation = cv2.INTER_AREA )
new = cv2.cvtColor( array[index], cv2.COLOR_BGR2GRAY )
new = cv2.subtract( array[index], backgroundimage )

      ret, mask = cv2.threshold(array[index], 10, 255, cv2.THRESH_BINARY) # example use

mask_inv = cv2.bitwise_not(mask)


# miscellaneous


      new = cv2.absdiff(255,array[index])

      height, width = cv2img.shape[:2]


      ## alternate way to create a mask
      by using techniques of subtracting background in videos.

      fgbg = cv2.BackgroundSubtractorMOG()

      fgmask = fgbg.apply(frame)
Arithmetic Operations on Images:
http://docs.opencv.org/master/d0/d86/tutorial_py_image_arithmetics.html#gsc.tab=0
BackGround Extraction using Running Average:
http://opencvpython.blogspot.com/2012/07/background-extraction-using-running.html
Numpy (scipy) documentation and tutorials (operations on matrices, and on linear algebra!):
http://scipy.github.io/old-wiki/pages/Tentative_NumPy_Tutorial.html
Commands to consider:
fgbg = cv2.BackgroundSubtractorMOG()
cv2greyimg = cv2.cvtColor( cv2img, cv2.COLOR_RGB2GRAY )
Contents of the Report:
You should write a report that includes at least the following following:
Your background image,
One of your subject images,
The final composed image, and also the final composed images of the provided images above.
Write-up includes both a description of your algorithm, and how you staged and planned your own composite image. You will need to clearly describe the algorithmic process you followed to generate the final image. The description should be sufficiently detailed that someone else could reproduce your results. You should also describe the design process: why did you select this location, background and foreground.
Discuss the final result. Did you succeed? Do you think you could have done better? Is your composed image of the instructor better than the one illustrated here on this page? Why or why not? Is the composed image of your scene better than the one you generated of the instructor using your algorithm? Why or why not?
What to Turn in:
You will need to turn in a report in pdf, a series of images (background, at most 3 of your subject or foreground images - even if you composite image includes more than 3 foreground images, the final composite of you images, and the composite of the instructor that are provided), your python code and a readme file with instructions on how to run your code.
-report.pdf -- writeup.
-component01.png, component02.png, component03.png -- Original images used for your foreground.
-background.png -- 1 background image
-composite0.png -- Your final composed image.
-composite1.png -- Final composed image of the provided images in zip file (of the instructor).
-multiplicity.py -- Your python code, must be easy to run.
-readme.txt -- readme file on how to run your code.
NOTE: only provide at most 3 of your foreground images, even if your composite image may include more than three images.
Rubric:
30 pts --- 6 images - 5 pts each.
15 pts --- python code - easy to run, modular and clean coding.
05 pts --- readme file.
Write-up Algorithmic Description (30 pts total):
10 pts --- description is clear, and describes a reasonable approach.
10 pts --- describes future work (can you do better algorithmically or not, why or why not)?
10 pts ---
can your algorithm generate a better blended image of the instructor than the one generated above why and why not)?
Write-up of your design process of your scene, and framing of your image (20 pts total), describe:
4 pts --- location.
4 pts --- light
4 pts ---
background
4 pts ---
foreground
4 pts ---
framing, how did you place your 'subjects' across the frame.
100 pts total.
--

