Project 3: Use A* Path Planning to find shortest path
Collaboration Policy - Read carefully you must work on this project individually, you may discuss this assignment with other students in the class and ask and provide help in useful ways, preferable over our email list so we can all benefit from your great ideas. You may consult (but not copy) any outside resources you including books, papers, web sites and people. If you use resources other than the class materials, indicate / cite what you used along with your answer.
| Assignment Day | Tuesday March 31, 2015 |
Due Date & Demo
|
Thursday April 09, 2015 |
Objectives & Requirement
The purpose of this assignment is to highlight use of a path planning that is often uses in game environments. In this particular assignment you will generate an animation of Patrick Lester's tutorial on A* star for beginners.
The tutorial depicts a 2D gridded environment with a starting position (green), and an ending position (in red). The goal is to find a shortest path from A to B. You assignment is to create an animation showing the progresso the algorithm.
In your animation you may of-course (and you probay should) change colors and add to the user interface to enhance the visuals of the A* algorithm. A goal should be present a clean, and easy to understand (and use) visual depicting how A* works.
At the start, you animation should display the begin map, and then animate the computions of A* as the algorithm progresses (tiles should incrementally be filled in with the values of F, G and H and the tiles should show the direction to its parent just like we will did in class (on the board).
The final display should show the tiles with all the values of the functions in A*, and the final path highlighted or drawn (see the image depicting the end environment further below). You should also indicate with a number, the number of the 'shortest' path found by A* (note if you use Manhattan distance, you may not have found the shortest path).
Here is an example begin environment (except it is missing some tiles, see the end environment for the missing tiles (you may choose a different color theme if you like).
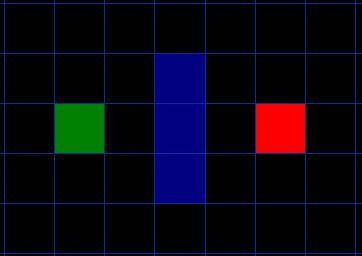
Here is an example end environment that also depicts the 'shortest' path highlighted in yellow using the manhattan distance.

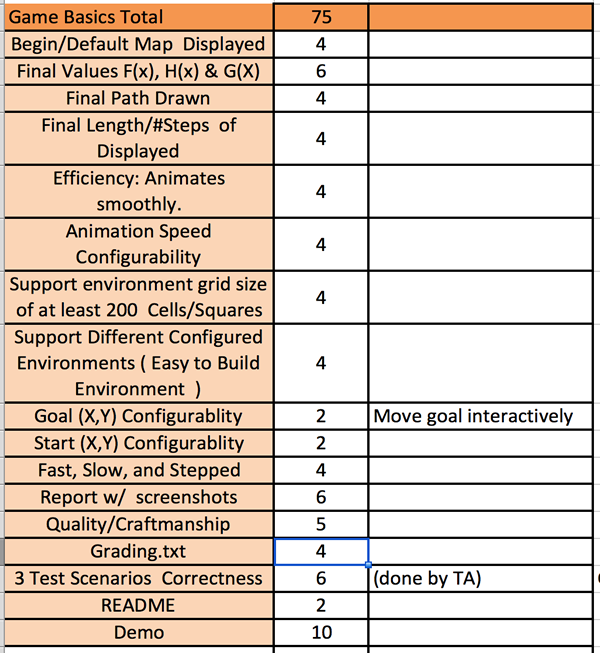
Your minimal requirements are (75 pts worth):
- You may use one of four Game Platforms listed below:
- Unreal (extra credit)
- HTML5/Canvas
- Unity
- ImpactJS
- Animation of the tutorial below
- Starting Environment, you may use a text file, or a dialog to create your your inital environment. An initial environment conists of start position, end position (goal), and obstacles.
- File: Your animating should be able read in different text files describing obstacles and traversible space, obstacles should be denoted by 'o' and traversible terrain should be denoted by 'e' for empty (tiles). Example text file of the above environment. You may enable your animation to read in a text file via a dialog or you can specify the file on the command line.
eeeeeeee
eeeeoeee
eeeeoeee
eeeeoeee
eeeeeeee
eeeeeeee - Dialog: You should be able to create different size environments, or grid dimensions, and interactively place the start and end (goal) positions, and draw the obstacles.
- File: Your animating should be able read in different text files describing obstacles and traversible space, obstacles should be denoted by 'o' and traversible terrain should be denoted by 'e' for empty (tiles). Example text file of the above environment. You may enable your animation to read in a text file via a dialog or you can specify the file on the command line.
- Include a button (or dial) to speed up or slow the animation so you can see how the functions in A star are computed (and the order values in a grid cell are computed). At the slowest speed the user should be able to simpley step through the animation.
- In your final frame of the animation you should draw the final path and you should also depict the length of the path with a number (number of steps).
- Look at grade criteria for addional details on grading.
- Expectations: It is expected that you make good programming design decisions. Your code should also be well documented.
- Goal: make your project look good, make it easy to use, and make your animation easy to understand.
Minimum Size: You sould at least make sure you can support a 200 cell, gridded environment, or smaller. Of-course better if you can support a larger environmnet.
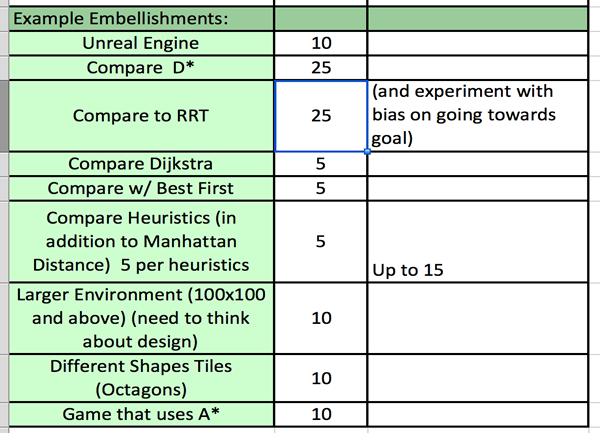
Below are ideas on embellishments to improve your grade to an A. Getting from a 75 to a 100 is based on effort. In your Grading.txt file you may argue how you achieved an 100 (or above!). Example embellishements:- Compare A* with D* (with visuals) up to 15 pts
- Compare against a rapidly exploring random tree (RRT) (wikipedia) (youtube) up to 25 pts
- Compare against Dijkstra's algorithm up to 5 pts
- Experiment with different Heuristic Functions (5 pts each, up to 15 pts with visuals.
- Embelish the interface (graded on effort).
- Provide for a large environment with an interesting terrain.
- e.g., 100 x 100, note that in this case font size may restrict displaying F, G, and H value, so stop displaying them when they become unreadable.
- Provide for different shaped tiles? e.g. octagons.
- Write a game that includes A*
- MAX :115 points!
Submission:
(for the below you may change the extension .txt if not plain text e.g., .doc, .pdf)
GRADING.txt: A description on how you met the grading rubric (see below table). You may copy paste these from REPORT.txt.
Example maps : at least 3 example map files should be included. One should be the map from the tutorial. THe map should not include source and destination.
REPORT.txt (or .pdf or .doc) should include minimally:
A description of what you did, how it works, screenshots and discussion on results.
README.txt should includelist of files required to run your game, and how to get your code up and running (e.g., HTML5 file, CSS file - if separate, and image files needed).
Grading Rubrics