 |
 |
 |
  |
 |
|||||||
Project 1 & 2: Canon Point & Shoot Hacking: Warm-up - HDR Imaging
| Assignment Day | February 10, 2011 (Thursday) |
| Due Date (project 1) | February 17, 2011 (Thursday night) submit source images produced by camera via CHDK. |
| Due Date (project 2) | February 24, 2011 (Thursday night) submit HDR images, and answer to questions |
(Michael Scott, our TA is our guide for this project)
(I am setting up a listserv email list for this class and you may discuss the project on that list. I used your email address listed on the class roll to enroll you on the list - if you prefer another email address please let me know)
Motivation:
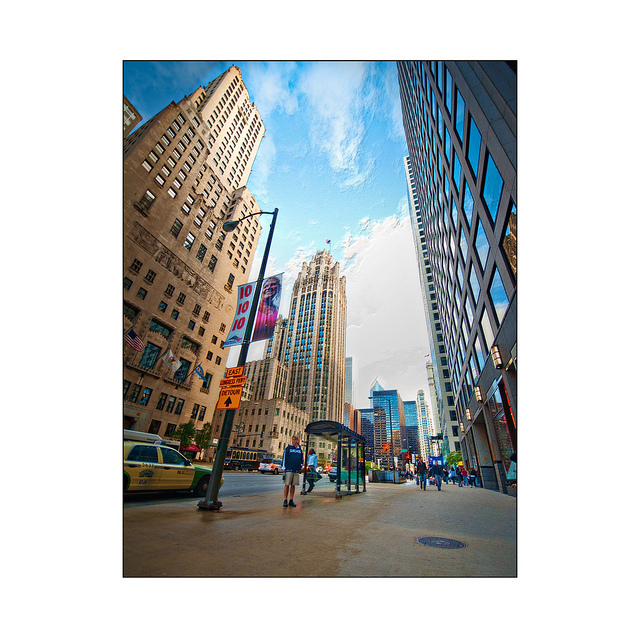
In this first series of projects (project 1 & project 2), you will install the CHDK on your camera, generate images and then off load the images and create an image (off-camera). The resulting image is said to have a high dynamic range (in terms of luminosity). You will accomplish this task by taking multiple photographs at various exposure settings (setting the bracketing feature in CHDK), and then using software such as Adobe Photoshop to combine the images into one HDR image.
Resources:
- 1 Canon A480 (or any other CHDK compatible camera, see here - and scroll down a bit to see list of compatible cameras). We will lend out a limited number of cameras, beware that if you don't return the camera or SHDC card you will receive an incomplete for each of the CHDK assignments and the end of course grade.
- 1 SD card (no more than 4G). There is a 128 MB card included in box of loaner cameras.
- 1 SD card reader or USB port ($7.00 or less)
- 1 hacking motivation!
CHKD Installation:
Check the web pages below:
http://chdk.wikia.com/wiki/CHDK
http://chdk.wikia.com/wiki/CHDK_in_Brief
http://chdk.wikia.com/wiki/FAQ
- Download the CHDK software, see here: http://mighty-hoernsche.de/ for a listing of zipped packages, if you use the loaner, A480 pick the complete build (2.1MB expanded).
a480-100b-0.9.9-1054-full.zip (see step 3, in CHDK_in brief above).
- Transfer the build to your SD card (this can be slightly tricky). There are two applications that streamline the process, one for windows (Card Tricks) and one for Mac (SDMInst). You can find a link to Card Tricks here:
http://chdk.wikia.com/wiki/FAQ
and the link for SDMInst for Mac here:
http://www.zenoshrdlu.com/clickpansdm/sdminst.html#The)
I tried the Mac version, SDMINS and it worked nicely.
These applications make sure that the software image that you 'transfer' from your download to the card is bootable.
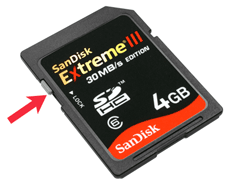
- After you prepared the card, eject the card and then write lock it via the mechanical write protect switch. See the toggle switch below:
- Start your camera, you will see the CHDK window on bootup.
- Now you are ready to use CHDK, go here,
http://chdk.wikia.com/wiki/CHDK_User_Manual
and scroll down to "Using CHDK", and even further down "It's running! What's next" (the firmware should be OK, so we skipped that part.
Now you need to find the <ALT> key. I believe this is the mode key on the back of
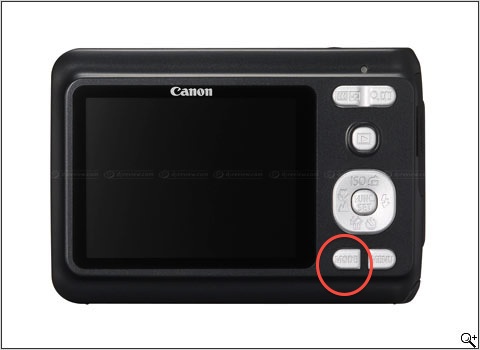
camera, see button inside red circle above, but you may try finding it by just trying different buttons.
- Play with camera and try different features, see for hints here:
http://www.britishideas.com/2010/06/03/chdk-and-canon-a480-quick-start-guide/
- Now for the Challenge: Create a HDR image, using exposure bracketing (shutter, or TV bracketing is probably a good bet for a starting point). Your end goal is to create an HDR image off camera. Here are some links that you may find helpful:
http://howto.wired.com/wiki/Supercharge_Your_Camera_with_Open-Source_CHDK_Firmware#Play_Around
http://abaditya.com/2008/04/19/playing-around-with-chdk-and-hdr-imagin
http://chdk.wikia.com/wiki/CHDK_firmware_usage/AllBest
Your intermediate goal (Project 1) is to generate multiple images on camera (using CHDK bracketing features, then off load the images off-camera and submit these images as JPGs (you may have to convert from DNG, or RAW format to JPG) on flickr and submit to group. Don't forget to add in the caption what you learned and any interesting tidbits of your image and your decision process.
The second part of the assignment (project 2) is to process the images that you shot in-camera (whether they were in the DNG, JPG or RAW format) into a single HDR image for each scene that you shot, and then create a JPG from that merged image and submit this merged image as part of project 2 (again you need to submit these images to our flickr group).
Instructions for Project 2: from images to HDR image.
- Shoot at least 3 images of a scene (or more for better result), using exposure bracketing to produce both underexposed and overexposed versions of the image along with a properly exposed image.
- Use photoshop's Merge to HDR feature (you may also use a trial version of photomatix or any other commercial HDR platform, or if you use Windows you may consider using a freeware, such as picturenaut. List of HDR software:
http://wiki.panotools.org/HDR_Software_overview
- Experiment with sliders, settings, and features (including curve/histogram) to produce various effects.
- Produce at least 2 output HDR images with different settings. For example you might want to try making one realistic photo which is an improvement over the source images and an example of a surreal artistic image. (This is just an example, you are free to do what you want)
Questions (Q1-Q3 is for project 1, and Q4-Q5 is for project 2).
- List at least 3 features in CHDK that is not available on camera without installing CHDK, that you found useful.
- Briefly outline how you generated the multiple exposures in CHDK?
- Describe your decision process in choosing a proper (interesting) scene for your HDR image.
- What is the result of the merging process that makes HDR images desirable?
- Briefly describe how modifying the various settings in the previous step (in steps "from images to HDR") affect the resultant image.
- Describe (at a very high-level) an algorithm for creating a HDR image from source images. Don't worry about using a particular language/pseudocode, just try to give a description in English.
Submission Project 1:
For items that are submitted to odin, plese use the submit command.
For odin items create a directory called "project1" that contains all of the material you are submitting on odin (questions & answer to questions). Then submit via the 'submit' command while in the parent directoy of projet 1 (while on odin.cs.uga.edu):
{odin:maria} submit project1 csx900
(1) Please submit questions 1-3 and answers in .pdf to csx900 on odin via the submit command.
(2) Please submit at least 2 source images to our flickr group with captions.
Submission Project 2:
(1) please submit questions 4-6 and answers in .pdf to csx900 on odin via the submit command (please put the QAs in a subdirectory named project2, then submit from parent directory "submit project2 csx900"
(2) Please submit at least 2 HDR images to our flickr group with appropriate caption.
Grading:
Project 1: 11:59PM, February 10, 201160% - Source images with proper exposure bracketing.
05%
- Post at least 2 images on our flickr group, and describe why you shot this scene.
30% - Answers to question 1-3.
05% - Creativity (really just insight, demonstrate that you understand the process).
Project 2: 11:59PM, February 17, 2011
60% - (2) generated HDR images.
05% -
Post at least 2 generated images to our flickr group, with an appropriate caption.
30% - Answers to questions 4-6.
05% - Creativity (really just insight, demonstrate that you understand the process).
Helpful Web Resources:
http://chdk.wikia.com/wiki/A480
http://lifehacker.com/387380/turn-your-point+and+shoot-into-a-super+camera
For project 2 - you may want to repeat the tutorial and work through them on your own, here are the links to the tutorials:
Photomatix tutorial and also link to RAW images in tutorial (did in class):
http://dannorcott.co.uk/hdr-tutorial/
CS5 HDR tutorial (uses JPGs):
http://www.graphicmania.net/how-to-create-hdr-photos-in-photoshop-cs5/